Wednesday, May 20, 2015

Adovia Purifying Dead Sea Mud Mask - Review

Powered by Brandbacker*


   Hey everyone! Since the warmer weather is here, sweat and environmental elements can clog the pores causing breakouts. Today I am reviewing Adovia Purifying Dead Sea Mud Mask that I think is the perfect solution for cleaning and unclogging your pores giving your face the tlc it needs and giving your skin a clean and youthful appearance. Scroll down for pics and my full review. Hope you enjoy!


The Purifying Dead Sea Mud Mask retails for $19.99 at amazon. According to Adovia ,
this mask does the following:

- Pulls out Toxins and Unclogs Pores so Your Skin Can Breathe and Rejuvenate Naturally
- Pulls out Excess Oil While Putting In Much Needed Essential Minerals from The Dead Sea
-100% Natural, Paraben Free, No added Fragrance or Color
-Improves Your Complexion by reducing blackheads, acne blemishes and the appearance of acne 
-Supplies nutrients to maintain elasticity and a soft, even texture.
-Helps with Oily Skin, Acne Treatment, Blackheads, Blemishes, Psoriasis, Eczema

The Purifying Dead Sea Mud Mask has many benefits such as:

It is  packed with over 26 Minerals essential for skin health Dead Sea Mud Pulls out --Toxins and Pore Clogging Particles while infusing skin with Much Needed Minerals 
 -Aloe Vera so that Your Skin is Not Over dried But Gets Natural Level of Moisture
-Vitamin C - for improving overall skin complexion and smoothness.


The mask has a very thick consistency .


Directions: It says to apply a thin layer all over the face and rinse off after 10-20mins or until the mask dries up. Then rinse with warm water. You can use this mask once a week or as much as you need it.


Review/Thoughts

I have been using the Purifying Dead Sea Mud Mask for about two weeks and I love it! I noticed a difference in my skin in about a week. When I first applied the Mask the texture feels thick and cool on the face. I left it on for 10 minutes one time and then 20 mins another time. I found that when I left it on for 20 mins my face felt much softer and smoother. My face felt wonderful afterwards and brighter. After about a week I noticed there were no breakouts and my skin felt less dry and softer to the touch. The facial mask also improved my skin's overall appearance. This mask is versatile because of the many benefits it has. For instance, if you have an acne or two you can put a dab of the mask on the acne as treatment. You can also use this to treat blackhead which works wonders. The Adovia Purifying Dead Sea Mud Mask has been my go to facial mask. My complexion never looked better and I highly recommend it !


You can purchase the Adovia Purifying Dead Sea Mud Mask here.


Hope you enjoyed this review and see you in my next blog post!

Maryam ox :)


Tuesday, May 12, 2015

Jaclyn Hill Favorites Eyeshadow Palette Review and Swatches


Hey guys hope everyone is doing well. Today I am bringing  you a review on a makeup palette by Morphe Brushes. This palette was created by Jaclyn  Hill and she selected her favorite eyeshadows from the brand. If you haven't heard of Jaclyn Hill, she is one of the most popular beauty guru on youtube and she is one of my favorites to watch.You can check her channel out here.  The Jaclyn Hill Favorites palette contains colors for all seasons and all skin tones. Hope you enjoy this review!


The Jaclyn Hill Favorite Palette retailed for about $27.99 .  It contains 27 shadows which bring each eyeshadow at $2 a piece. This palette contains matte and shimmer eyeshadows.


Pretty Pictures

You have your colorful eyeshadows

and
you have your neutral colors which makes this palette versatile.


 Swatches!
I swatched some of the colors of the palette so you can get a feel of how some of the colors look and how pigmented they are. Wonderful pigmentation and they blend so well. Each eyeshadow is bigger than a quarter.


Pigmentation: Very pigmented as you can see from the swatches.
Texture: A few are powdery, but for the most part the shadows feel smooth.
Longevity: Eyeshadows lasted for about 7 hours. 
Blendability: The eyeshadows blend very well together.

Review/Thoughts

  Prior to this I have never heard of the brand called Morphe Brushes until Jaclyn Hill talked about the eyeshadows she purchased from them in one of her videos. I loved the pigmentation and decided to purchase her palette right away when it went on sale. When I opened the palette it was love at first site. Although these colors am sure I have in other palettes, but the pigmentation is what won me over. These shadows are so pigmented and blend seamlessly into each other. For the price, the quality of the eyeshadows beat some of the name brand eyeshadows palettes that are out right now. This is great for someone who is starting out with makeup, because it affordable and the palette has great range of colors that you can create many makeup looks from. It's great for all seasons and skin tones. When I wore these eyeshadows they lasted for about 7 hours . I am very pleased with the Jaclyn Hill Favorites Palette and she has great taste in eyeshadow colors. If you are geared towards warm toned shadows then you might want to check out the individual eyeshadow pans that are available on their website as well.


      Unfortunately,  the Jaclyn Hill Favorites Palette is sold out, but have no fear you can still purchase the eyeshadows individually. Here is the list of the eyeshadow numbers:

First row:ES4, ES54, ES6, ES76, ES64, ES14, ES75
Second row:ES67, ES13, ES62, ES63, ES20, ES27, ES66
Third row:ES33, ES68, ES16, ES15, ES61, ES24, ES74
Fourth row:ES11, ES59, ES38, ES53, ES48, ES71, ES19


You can check out morphebrushes for more affordable makeup and amazing makeup brushes.


Hope you enjoyed this review and see you in my next blog post!

Maryam ox


*Product was purchased by me*

Tuesday, April 28, 2015

Rimmel London Provocalips 16 hr Kiss Proof Lip Colour Review+ Swatches


Hey guys! Lipstains and liquid lipsticks is one of the things that is trending in the beauty world. I stumbled upon the Rimmel London Provocalips 16hr Kiss Proof Lip Colour at the drugstore and decided to give it a try. I selected wearable lip colors for everyday use. Hope you find this review helpful and enjoy! :)


The Rimmel London 16 Hr Kiss Proof Lip Colour retails for about $6.99. According to Rimmel London this product is kiss proof, food proof high impact endless color.


The directions say to apply the lip color to your lips and keep the lips apart for 60 seconds until the product sets.
Then apply the top coat to lock in the color, moisture, and add shine. 


Swatches!
Play With Fire- is an intense red lipstick . Such a beautiful red color. If you are looking  for that perfect red lipstick then this is the one. This is more of a classic red lipstick. 
Kiss Fatal -is berry mauve color. 
Heart Breaker is a softer tone red with orange undertones.
Make your move- is a pinky brown nude color. 


Did it live up to the claim?

Yes!

Review/Thoughts

This is the best kiss proof lipstick that I have ever tried from a drugstore. It stays on your lips when you are done eating and the intensity of the color does not fade until about 7 hrs of wear. The topcoat does give your lips a nice shine, but the shine does fade over a few hours. Throughout the day I ate and drank and the lipstick was still going strong on my lips. I could give plenty of smooches to my children and not have to worry painting their cheeks with lipstick. I demonstrated to my kids that the lipstick does not come off and they were amazed. lol. It is a bit drying, but that is to be expected when it comes to kiss proof or liquid lipsticks. I just added a bit of gloss. However, when I did add the gloss, I noticed that the color did transfer. I guess the gloss took away the top coat from the lipstick. The Rimmel London Provocalips 16 Hr Proof Lip Colour is a great alternative from some of the more expensive high end liquid lipsticks. I highly recommend this product. It lives up to the claims and won't burn a hole in your pockets. 

You can purchase this at your local drugstore. I purchased these items from Walgreens.


Hope you enjoyed the review and found it helpful. Do you own the Rimmel London Provocalips 16 hr Proof Lip Colour? If you do what are your thoughts? Leave a  comment below.


Have a great day and see you in my next blog post.

Maryam ox


*Products were purchased by me*

Monday, April 20, 2015

Spring Into Neon Makeup # 2 Tutorial Ft. Wet n Wild and Urban Decay


Hey everyone! Hope you all are well. Today I am brining you another tutorial that incorporates a neon color to give this neutral look a pop of color. It's all about being comfortable using more color in our makeup looks now that spring is here. Hope you enjoy this tutorial! :)


Tutorial

*Prime your eyes with an eyeshadow base or primer*

When it comes to the applying makeup I use the B word a lot.. No not that  B word lol The word Blend. Blending is key to having the eyeshadow colors seemlessly blend into one another without any harsh lines.

Take color # 1 and pat it all over the lid.
Next apply color #2 and apply in to your crease. Blend
Use the color #3 and apply to the brow bone to add a highlight to your makeup look. Blend
Add color # 4 to your outer corner and up midway into the  crease area of your eye. Blend.
Choose your favorite black mascara and apply it to your lashes.
To add a pop of color to your look, take color #5 and apply it below your lower lash line. Use a blending brush to smooth out the color a little.
Add black eyeliner to your waterline.
Take a black mascara and apply it to your lower lashes.
Done!


Finished look!


Products I used


Products used:
Urban Decay Electric Palette
Bahama Mama
Milani Baked Powder Blush in Red Vino
Master Conceal Concealer in Medium by Maybelline
Nyc Liquid Eyeliner in Black
Maybelline The Elixer in Rose Defined
Lorac Alter Ego Lipstick in CEO
Rimmel London Lipliner in Spice
Wet n Wild Eyeshadow Palette in Comfort Zone
Revlon Nearly Naked Foundation in Warm Beige
Urban Decay 24/7 Glide On Eye Pencil in Perversion
Loreal Paris Butterfly Mascara


There you you have it ! Hope you like the look. I have been using a lot of neon colors lately and using it as a pop of color to your eye makeup really gives the look life.

Hope you give this look a try. Thanks for stopping by and see you guys in my next blog post.

Maryam ox


Wednesday, April 15, 2015

Spring into Neon Makeup Tutorial #1 Ft. Bh Cosmetics and Urban Decay


Hey guys! Hope everyone is doing well. I don't know about you, but now that it's spring I am more inspired trying on colorful eyeshadows. Also as much as I love neutral eyeshadows, I thought I would venture more into color. I wanted to do a makeup look and add a pop of bright color as an accent to the look. I really like how it came out and the neon green really compliments the rest of the eyeshadow colors I used. This is the perfect look to wear for spring and a nice look to wear to transition into summer. Hope you enjoy this pictorial ! 


When I do makeup looks, a blender brush is a must to blend out the eyeshadows so there won't be any harsh lines. I also started with the crease color first and put on the eyeshadow on the lid last so the color won't become faded while applying the crease colors. I think I like doing it this way best.


*Prime your eyes first with an eyeshadow primer.*

Apply color #1 to your crease. Blend.
Take color #2 and add it to the outer corner up to the crease midway. Blend
For the brow bone use color #3. Blend.
Next take color #4 and pack it onto the lid.
Add black liquid liner.
Add black mascara.
Below the lash line, apply color #5. Before applying the eyeshadow, make sure you apply eye primer first to this area so the color will stick and be more vibrant. I also applied this color wet.
Use black eyeliner and apply to your waterline.
For the lower lashes apply black mascara.


Finished look!

If you are afraid to wear neon eyeshadow colors, then this is a way to incorporate it into your look with out overdoing it. 


Products used:


Hope you enjoyed this makeup pictorial and I hope that I inspired you to use bright colors in your makeup. It's good to try new things ;)

Thanks for stopping by and see you guys in my next blog post!


Maryam ox


Friday, April 3, 2015

My Top Five Drugstore Lip Products for Spring 2015


Hey guys! Spring has sprung and the pink, lilac, nude lipsticks and lip glosses are dominating the makeup aisles in your local drugstores. If you are a makeup enthusiast like me you probably already have some of these products or products with similar colors. If not I highly recommend these lip products. I have been using these lippies even in the winter and thought these colors would be perfect to wear during the spring. Hope you enjoy this blog post! :)


Starting from the left :
Revlon Color Burst Matte Balm in Elusive
Revlon Super Lustrous Lipstick in Berry Haute
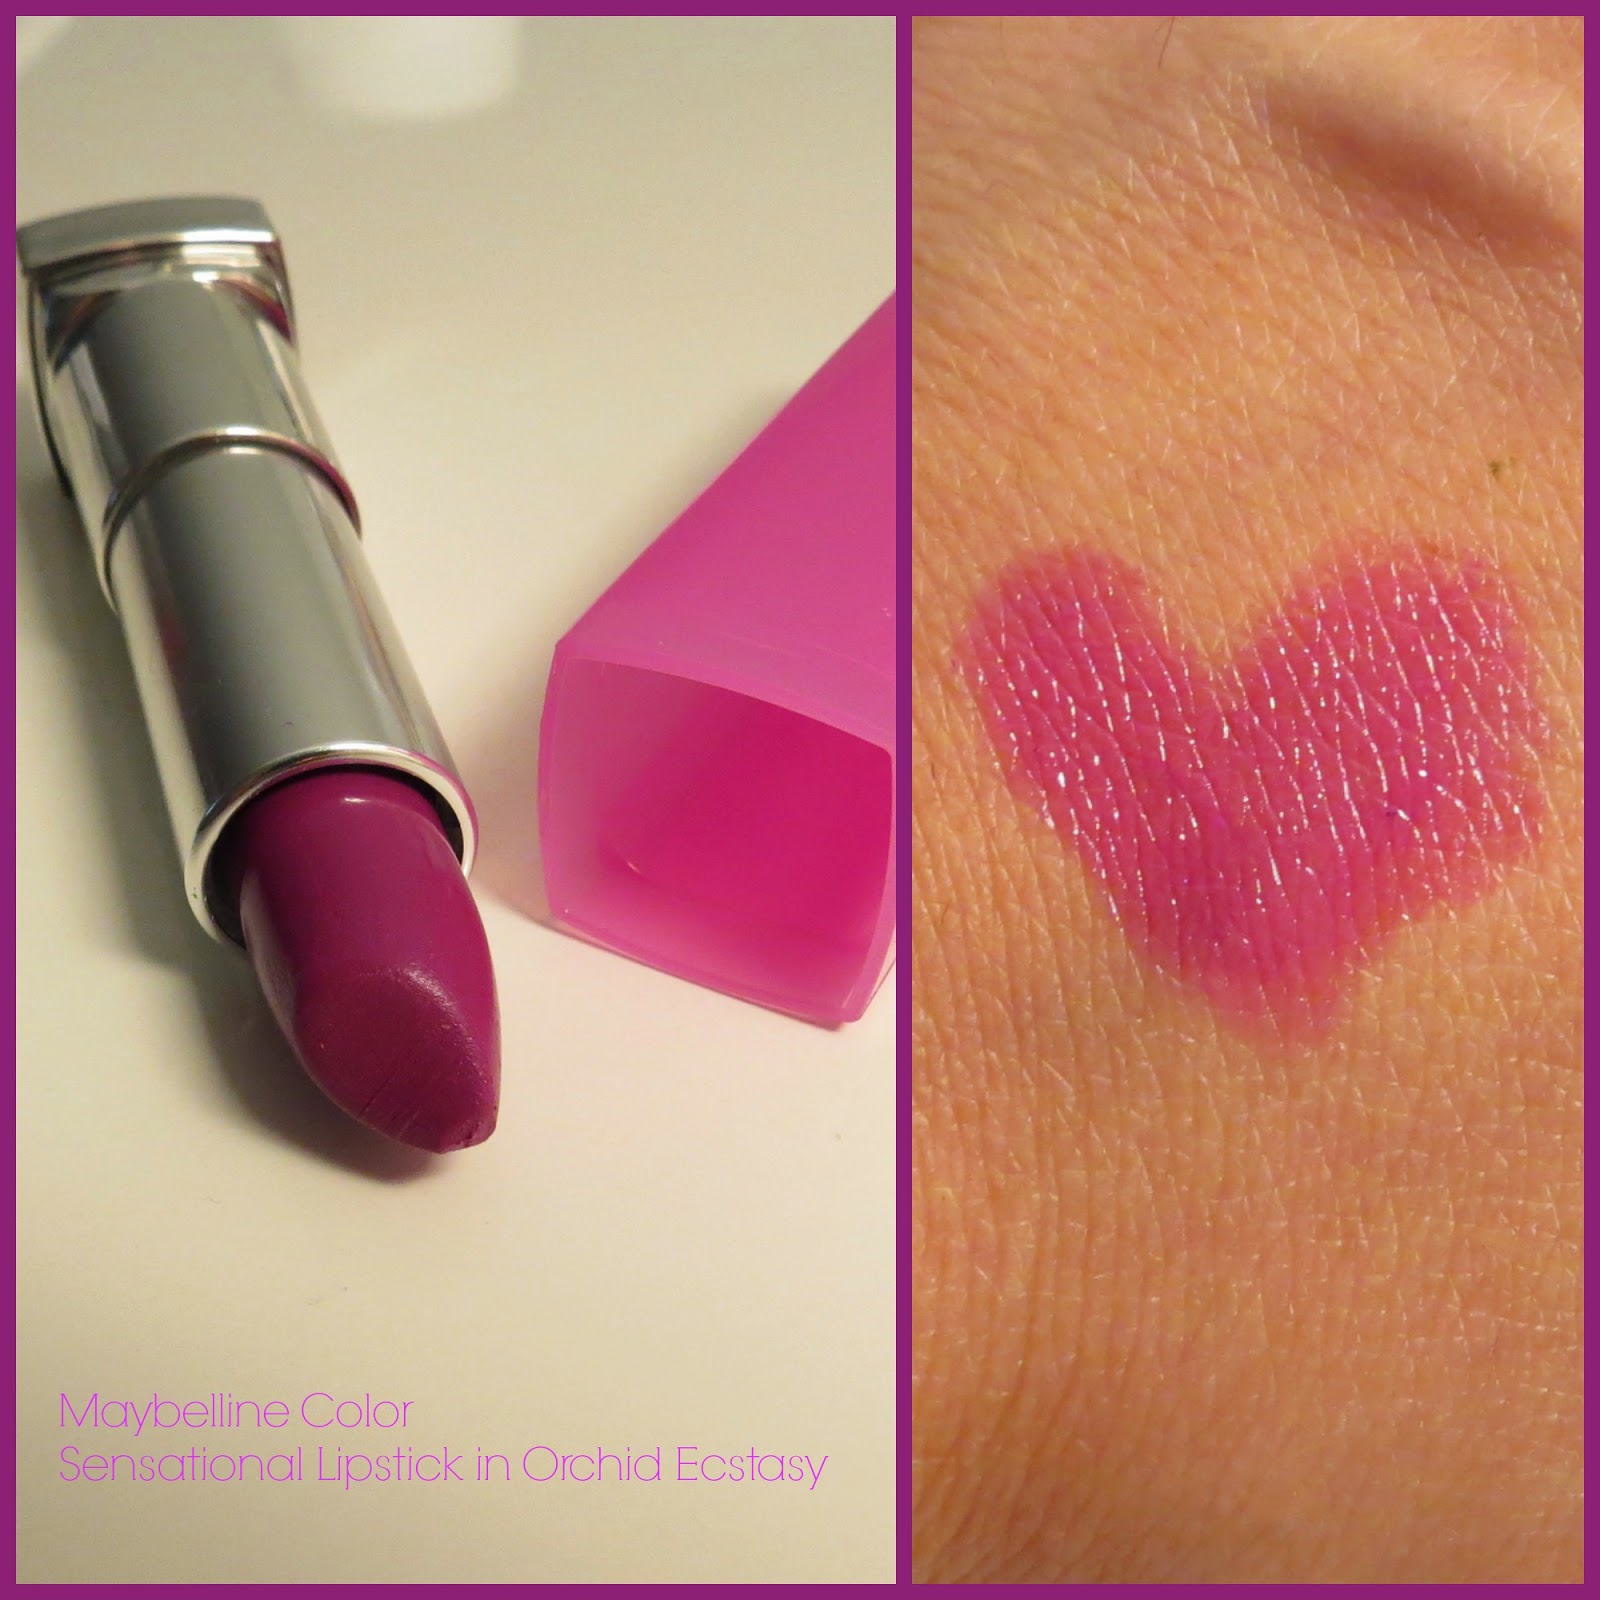
Maybelline Color Sensational Lipstick in Orchid Ecstasy
Milani Color Statement Lipstick in Naturally Chic
Maybelline Color Elixer in Rose Redefined


These colors scream spring. My fave out of the bunch lately is the second one from the left by Revlon called Berry Haute. It is the perfect soft purple shade.

If you are looking for a pink lipstick that is not too light then this one is perfect. If you do not like the matte finish then you can always apply a lighter pink lipgloss on top.

This color is my favorite lately. It is a beautiful soft purple. If you are afraid to wear purple or do not want to wear a purple shade that it too bright, this is a much toned down purple that is nice to wear everyday. 


The Maybelline Color Sensational lipstick is a nice orchid pink . This is a nice pink shade to wear that is not too bright. 

Milani Color Statement Lipstick in Naturally Chic. Can't forget the nude lipsticks for spring. This particular nude is a pinky nude that doesn't wash out your lips and gives it a nice subtle color. Love it.

Maybelline Color Elixer in Rose Defined is a nice lipgloss that you can wear alone or over your lipstick in similar shades. 


Hope you liked my top five drugstore lip products. I realize I need more coral lip products. If you have any recommendations as to which coral drugstore lip products I should check out leave a comment below. 

Thanks for stopping by my blog and see you in my next blog post. :)

Maryam ox


*Products purchased by me*

Saturday, March 28, 2015

Spring Bloom Makeup Tutorial


Hey guys hope you are all well! Yes! Spring is here and I couldn't be happier. In the makeup world the pastels, rosy pinks and lilacs make their comeback in lipsticks, lip glosses, blushes and eyeshadows. This look is inspired by the beautiful flowers that come to life during the Spring. I love pink flowers and decided to create a look inspired by them.  I added a pop of green to mimic the green leaves and stem of the flowers. Hope you enjoy this look! :)


*Prime the eyelids and lower lash line with eyeshadow base*

1.Apply the color Wisteria onto the lid.
2. Next, take the color Cupcake and add it to the crease. This will act as transition color. Make sure you blend.
3. Take the color Simply Marlena and apply it to the crease and blend.
4. On the inner crease take the color Razzleberry and apply it to the inner crease. Blend.
5.Use the color Vanilla Bean and apply it to the brow bone.
6. Apply bitten to the outter corner and blend it up to the crease midway.
During the process of applying the eyeshadows to your eye, make sure you take the color Wisteria and touch up the lid along the way.
7.Apply black masacra.
8.Use black eyeliner and apply it to the water line.
9.Use a green eyeliner and apply it to the lower lash line. This will act as a base to eyeshadow color you place on top.
10. Take the  color Sea mist and apply on your lower lash line on top of the green eyeliner.
11. Next use the color Shimma Shimma and apply it to the inner tear duct.
*Once I am done again I take the color Wisteria to touch up the lid.*


Spring Bloom Makeup


Products Used

Makeup Geek Eyeshadow singles as seen above.
Jordan Lipliner in Rock'n Rose
Milani Color Statement Lipstick in Naturally Chic
Naked Skin Foundation in 7.0
Age Rewind Eraser Dark Circle Concealer in medium.
L'oreal Lash Out Butterfly Mascara
L'oreal Smoldering Eyeliner in Black.
Urban Decay Eyeliner in Flipside
Makeup Geek Blush in Rendezvous

Hope you enjoyed this tutorial and get to try it out . Have a great day guys and see you in my next blog post.

Maryamox