Wednesday, January 27, 2016

Romantic Halo Makeup Look Ft. Inglot Cosmetics


      Hey guys! Coming at you with another pictorial. I wanted to incorporate a neutral look with a pop of color and what better way to do it with than a nice soft pink eyeshadow color. I am experimenting with different eye techniques and decided to create a halo makeup look. I think this method is a nice way to introduce a pop of color to any makeup look especially a neutral one. I think this color combo creates a romantic vibe and can be used for those who celebrate valentines day. I hope you enjoy this pictorial!


Pictorial

*Prime the eyes with an eyeshadow primer*
*For the Brow Bone I used the cream color in the second palette. Blend.
*In the crease area I used the light taupe beige color from the second palette. Blend
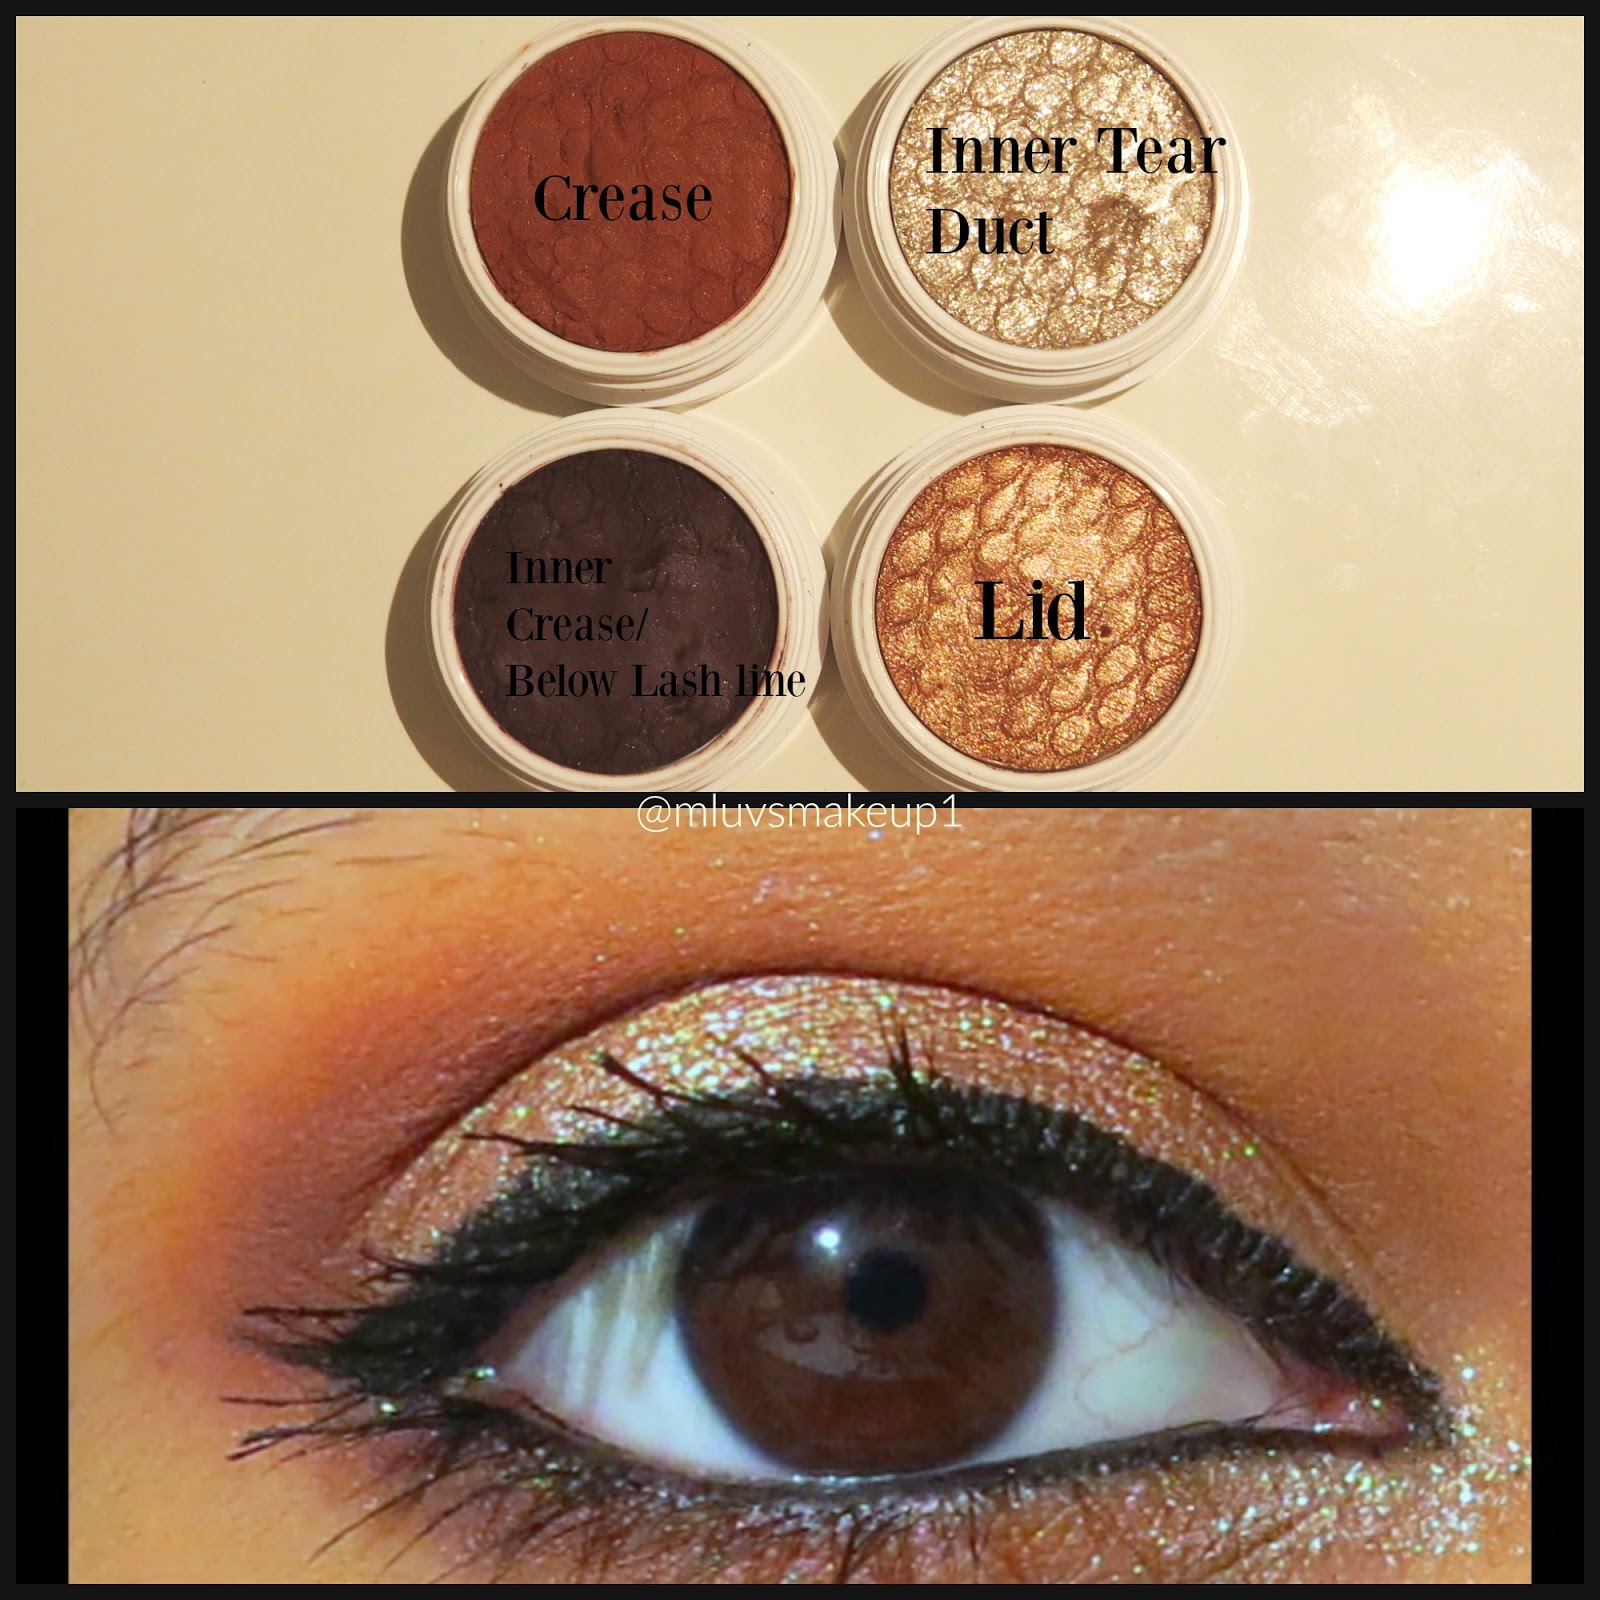
*To darken up the inner crease I used the dusty matte brown in the second palette. Blend
*I added the darker brown nest to the dusty brown to the outer v to smoke up the look a bit. Blend
* I took that same dark brown color and applied over lid except for the mid lid.
* For the mid Lid I add the baby pink color that is in the first palette. I first wet the brush and applied the shadow to give it more color payoff. Carefully blend it into the brown color to avoid harsh lines.
* Take a black eyeliner and apply it over the lid. I wanted to use the eye liner to make the pink pop out more.
*Curl lashes and apply your favorite mascara.
*On the water line I used black eyeliner.
*I wanted to add more of the pink color, so I decided to add the same pink color I used on my mid lid area and applied it below the lash line. Blend.

*On the outer corner below the lash line I used the dark brown in the second palette to smoke up the corners.
* To add a bit of a highlight, I added the pale gold eyeshadow in the first palette and applied it to the inner tear ducts.
*Add mascara to your lower lashes.

Look Complete!


Finished Look!

Such a soft romantic makeup look perfect to wear during the day or night time on a date or if you celebrate Valentine's Day this will go with any outfit. Also, if you are afraid to wear a bold pink look or do not know how to incorporate a pink color into your eye makeup this is a nice way to do it. I decided to add the black eyeliner with a sharp wing to create more drama and the black color from the eyeliner makes the pink pop out more.


Products Used:

Inglot Freedom System Palettes. I custom made these palettes and each eyeshadow retails for $7, but got them on sale during black friday for 30% off. I am all about the sales lol. I always wait during that time of year to purchase the palette.

Inglot Gel Liner # 77 which a is matte black.

Mascara: Loreal Voluminous Mascara in carbon  black.


Hope you enjoyed this tutorial and see you guys in my next blog post.


Maryam ox

Monday, January 25, 2016

Rose Gold Makeup Look Ft. ColourPop's Kathleen Lights Where The Night Is Eyeshadows


       Hey guys! Hope everyone is doing well. Today I am bringing you a pictorial on how to recreate this rose gold makeup look. For the look I used the ColourPop Kathleen Lights Where The Night Is Eyeshadows. You can find my review of these shadows here. You do not have to use these eye shadows. You can always use eyeshadows that are similar in color. I love this look and wear this often. Hope you enjoy this pictorial and give this look a try. :)


Pictorial


*Prime the eyes with eyeshadow primer*

* Apply cream color shadow to your brow bone.
*For the crease I used the burgundy color. Blend.
*I applied the dark olive eyeshadow color in the outer v up to the middle inner crease. Blend.
*I used the beautiful rose gold color and applied it all over the lid first with a synthetic brush, then I applied another layer of color with my finger.
*Use your favorite black eyeliner for the lid.
*Curl lashes and apply black mascara.
*Apply black eyeliner to your waterline.
*I used the burgundy color below the lash line.Blend.
* For the inner tear duct I used the rose gold eyeshadow.
*Apply mascara to the lower lash line.

Look Complete!


Finished Look


     Warm tone colored eyeshadows are colors that I gravitate toward because you can wear them every day and all year round and the compliment my eye color more. The colors remind me of the warmer months which I can't wait for. I am done wit winter! lol


Hope you enjoyed this pictorial and give this look a try!


See you in my next blog post!


Maryam ox


Friday, January 22, 2016

ColourPop X Kathleen Lights Where The Night Is Collection: Review and Swatches


       Hey guys! I am excited about this review because I love ColourPop and their amazing shadows and lipsticks. When I heard that youtuber Kathleen Lights was doing a collab with colourpop I was so excited and knew that I had to buy her collection. I know she came out with a previous collection, but I was more excited for this one because the colors were more my style.  The Kathleen Lights Where The Night Is consist of 4 super shock shadows. Kathleen Light also came out with two lippie pencils and two lippie sticks. If you would like to know more and see swatches and review please scroll down. :)


The Colourpop X Kathleen Lights Where the Night Is Eye Shadow Collection retails at $20.00. Her lip products that go with her collection are sold separately. The lippie stix and lippie pencil retail at $5.00 each. 


I love coloupop's packaging. It is nice and simple.


Look how gorgeous these colors are!! These colors are truly pigmented.


Swatches!


This picture of swatches do not do the colors justice. They are much much much more beautiful in person. 

Telepathy (ultra metallic)- Is a true bright gold. I do not own a color like this in my collection. This color is absolutely gorgeous. It is much more vibrant in person.
Midnight(metallic)- Is a dark olive color. Perfect for smoking up a look by adding it to the outer corners of the eye.
Porter(metallic)- is a burgundy color. 
Weenie(Pearlized) -Is a rose gold color. This color is my favorite in the entire collection. If you love rose gold and are looking a rose gold shadow this is the one to get. I would buy another one of these because it is such a gorgeous color and I do not own a color like this in my collection.


Taurus Lippie Stix and Lip Pencil (matte)- is a true red brown color. I do not own a color like this in my collection. This color is so beautiful. Perfect brown lipstick.

Aquarius Lippie Stix and Lip Pencil(Cream)-  is a light brown nude shade. Depending on your skin tone if you have light complexion it will look more pinky nude and if you have olive and darker complexion it will be more on the light nude side.

These lip products have wonderful pigmentation and go on so smooth. The matte lippie stix in Taurus is not drying at all. Wonderful formula for a matte lipstick.


           As you can tell I love the Kathleen Lights Where the Night Is Collection along with her lippie stix and pencils. She did a wonderful job selecting the colors on everything. The colourpop eyeshadows have amazing pigmentation and stay put all day long with no signs of creasing. When applying the shadows make sure you use a synthetic brush because it picks up the color well. Using your fingers to apply shadow on the lid give greater color payoff . What I do is I apply the color first with a synthetic brush to my lids then apply another coat of eyeshadow with my fingers. As for the lipsticks and pencils they have wonderful color payoff and go on so smoothly onto the lips. I absolutely love colourpop lippie stix. They have wonderful formula and are so affordable. If you do not own any coloupop eyeshadows or lip products the Colourpop X Kathleen Lights Where The Night is Eyeshadow Collection along with her lip products is a good collection to start with. Trust me you will not be disappointed. :) If you do not want to purchase the full collection you can buy the eyeshadows individually.


                                 You can find The Kathleen Lights Where The Night Is Collection here
                    Kathleen Lights Taurus lippie stix and pencil here
                         Kathleen Lights Aquarius lippie stix and pencil  here.


Hope you Enjoyed this review and found it helpful :)


Do you own the Kathleen Lights Where The Night Is Collection? Do you own any ColourPop eyeshadows or lip products? Leave a comment below!


I will have a makeup pictorial using these shadows in my upcoming blog post so keep a look out. :)

See you guys in my next blog post!

Hope everyone who is on the east coast stay safe during the winter storm!


Maryam ox


*Product purchased by me*

Wednesday, January 20, 2016

Simple Makeup Looks For Busy Moms


     Hey guys! As a mom of 3 soon to be 4, most of the time I just do not have the time to put on a full face of makeup. I am busy running around taking my kids to school, cooking and doing daily mom chores. At times I look in the mirror and think to my self I look like a zombie lol. Sometimes us busy moms need time to just glam up a bit. Even if it is just to put on lipgloss. A little lipgloss goes a long way and can liven up the face. If you fit in the category of a busy mom or you are just a busy woman than I came up with simple makeup looks that I wear when I just do not have the time for makeup, but want to liven up the face. These looks take no loner than 5 minutes. As a busy mom, five minutes sometimes is all we have. Hope you find these makeup looks helpful and take time to pamper yourself even if it is only for 5 mins. :) 


Simple Makeup Looks For Busy Moms


So let's get into it. As you can see the first picture I have no makeup on. I look tired.lol
In look # 1, I applied mascara and you can see that it livened up my face a bit. I used the Loreal Voluminous Mascara and it gave volume and length to my lashes. Sometimes I would only use this and go out the door.
If I want to add more color to the eye, in Look #2 I would add mascara, neutral color or a pop of color depending on my mood and apply it only to my lid and add eyeliner to my water line.
In look # 3, if I want to add more depth to my look I would simply apply a neutral brown color to my crease, neutral color to my lid, mascara and eyeliner to my water line. 

Using these different simple makeup looks make a difference on the face without having to try to hard. As a mom a full face of makeup is very rare. I try my best to make some time to get glam even if it just means only applying mascara. :)

All these makeup look take about less to no more than 5 minutes.

Lip choices to go with your simple makeup look


     You can pair these simple makeup looks with lipstick or lipgloss or you can skip the makeup and just apply gloss and it will liven up your face. If you want to take an extra step you can take these lip color choices and pick which makeup look to pair it with. If you want a subtle pop of color, the first color starting from the bottom is a nice everyday color to wear. If you want to add more color  without wearing such a bold lipstick color the next three colors that have nice berry tones are nice to wear with or without makeup. If you are into really light nudes like the first color on top, I would suggest wearing the light nude shades of lipstick with at least a mascara or eyeliner or else you will appear to be sick.


Here are the names of the lipsticks and lip glosses. Beautiful everyday shades to wear.


My Makeup picks

These are the products that I used to create my simple makeup looks along with the lipsticks and glosses.


     My go to mascara is the Loreal Voluminous Mascara in Carbon Black. It does wonders for my lashes giving it volume and length. I always use the Urban Decay 24/7 eyeliner in Zero. It lasts most of the day and I do not have to worry about reapplying it. You can find the eyeliner at Sephora and you can find the Loreal  mascara at drugstores nationwide.

I used this color on my lid. This is the Loreal Infallible eyeshadow in the color Amber.  It is best applied with your fingers. Great pigmentation and beautiful color for everyday wear. You can find this at drugstores nationwide.

     As for the eyeshadow, I used this for my crease and brow bone. If you are looking for an every day eyeshadow palette then this is it. Beautiful neutral shades and if you want to add drama you can quickly pop the black in your outer v area of the eye. Love this palette. You can find this at Sephora or Ulta.


     There you have it. If you are not into makeup there are other ways to take time and pamper yourself, but I chose makeup for the moms who love it, but do not have time to wear it.

     Again, as a mom it is very important to take time for ourselves. Whether it's makeup, facials, reading a book or doing something you love to do. Even if it's only for 5, 10 or 15 minutes. Taking time for ourselves helps us to rejuvenate and get back to tackling the rest of day.


                  Hope you enjoyed the simple makeup looks for busy moms and give them and try and see how it will liven up your face on the days when you feel and look so tired.


Moms and non moms, what is your go to everyday makeup? Leave a comment below.


See you guys in my next blog post!

((Hugs to all the mommies out there)) 

:)

Maryam ox

Monday, January 18, 2016

Winter Aurora Borealis Inspired Halo Makeup Look Ft. Inglot Cosmetics


Hey guys! Hope everyone is doing well. Today I am super excited to be showing you this look because I love it so much. One day I was just playing around with colors and came up with this look. I posted this look on my instagram and I wanted to share this look and how to achieve it with my blog family. :) I was sitting for about 20 minutes trying to figure out what to call this look. Then it hit me! I googled winter aurora borealis and stumbled upon the picture above. It is so beautiful and looked a lot like the makeup look I created, so I decided to name the look  Winter Aurora Borealis Halo Inspired Halo Makeup Look. You must be thinking what is a halo look? This is a makeup technique where you created a halo of color around the eye, and applying another color to the mid lid. I hope you enjoy this pictorial and give this look a try! :)


Pictorial

*Prime the eyes with an eyeshadow primer
*I applied the cream eyeshadow color to the brow bone.
*Next I applied the purple eyeshadow color from the second picture all over the crease from the outer point of the eye to the inner point. Blend.
*Then I took the purple color from the first picture and applied it to the inner crease from the inner to outer point of the eye. Blend.
*For the inner lid and outer lid I used the same purple I used for the inner crease. Blend.
*In the middle lid I used the bright turquoise color. Make sure you blend it into the purple to avoid harsh lines.
*Use a black gel liner or liquid liner and lie your lid.
*Curl lashes and apply your favorite mascara.
*I wanted to try something new so I used the same turquoise eyeshadow color and added it to my waterline.
* Below my lash line I used the grape purple pictured on the left . Blend.
*In my inner tear duct I used the turquoise eyeshadow color.
*Finally I applied mascara to my lower lashes.

Look Complete!


 Finished Look


     I really love how this look came out. I love the turquoise color and how it compliments the purple. The turquoise adds such a nice pop of color to the look. This has to be one of my favorite looks I created this year.


Products Used:
Inglot Cosmetics Freedom System Palettes
Inglot Gel Liner #77
Loreal Voluminous Mascara In Carbon Black


Hope you guys give this look a try! :)

See you lovelies in my next blog post! :)


Maryam ox

Friday, January 15, 2016

Smokey Eye With Pops Of Color and Glitter Makeup Look Ft. Make Up For Ever 15 Artist Palette


    Hey guys! Hope everyone is well. I have been on a smokey eye makeup roll lately and I wanted to add a little twist. A few blog posts ago I created a brown smokey eye look which you can check out here. In this one, I added a few pops of color such as burgundy, purple and lilac purple. In the second picture I added a purple glitter liner near the tear duct to add some glam to the look. Hope you enjoy this pictorial! 


Pictorial

1. Prime the eyes with an eye primer. I used the urban decay eye primer.
2. Next I too the Color S522 and applied from lid to brow bone. I did this so when I apply my eyeshadows it will blend easier and won't skip.
3. For the crease I applied the color D826 and used this as a transition color to warm up my smokey eye look. Blend.
4. I applied the color S102 to the outer v to smoke out the look a bit. Blend
5. On the outer lid I took the color S102 again and applied half way on my lid.
6. Then I applied the color I916 on the inner portion of my lid. Gently blend it into the black.
7. I wanted a more gradient effect on the lid so I took the color I922 and applied on the middle of my lid. Gently blend the colors together to remove harsh lines.
8. Add Black mascara. I used Loreal Voluminous Mascara in carbon black. Now is the time to add false lashes if you have any.
9. Add black eyeliner to your waterline.
10. I added the color I922 below my lower lash line for more pop of color. I then wanted the purple color to pop more so I added the color Me 216 in the middle below the lower lash line.
11. For the tear duct I added the color I916.

For the second look I just added a purple glitter liner near my tear duct. This is optional and I wanted to add this to add glam to the look.


Finished Look
Purples and black eyeshadows make brown eyes pop.


 With Glitter Liner

     The lilac purple really brightened up the look and the purple was a nice pop of color as well as the glitter. The burgundy color was a beautiful transition shade to warm up the smokey eye.


I hope you enjoyed this pictorial and give it a try!


See you in my next blog post!


Maryam ox


Wednesday, January 13, 2016

Golden Sunset Makeup Ft. ColourPop Super Shock Shadows


      Hey guys! The winter cold has finally hit us east coasters and I thought I would warm things up a bit by creating a warm makeup look. To achieve this look I used the colourpop super shock eyeshadows.  They are amazing! I hope to have a review on them in the coming week. Hope you enjoy this pictorial and give this look a try. :)


Pictorial

1. Prime the eye with an eye primer.
*To work with these shadows it is best to use a synthetic brush for better color application.*
2. In the crease I used the color burnt brown color in windshield wiper motions. Blend.
3. I took a cream tone color eyeshadow and applied it to the brown bone. 
4. Next, I applied the dark brown in the outer crease to darken it up just a bit. Blend.
5. On the lid I used the golden color and patted in the lid. 
6 Apply black gel or liquid mascara.
7. Curl Lashes and apply mascara. If you use falsies now is the time to apply them.
8. Apply black eyeliner to your waterline.
9. I took the same dark brown that I used in the crease and applied it below the lower lash line to smoke up the bottom a bit. Blend.
10. For the inner tear duct I used the white gold color.
11. Finally apply mascara to your lower lashes.

Look Complete!


You can never go wrong with gold and burnt brown eyeshadows as a nice warm neutral look. I have done this look a few times and I love it! I will be definitely be rocking this look a lot in the spring and summer months.


Colorpop Eyeshadows: 
Crease:Melrose
Innser Crease -Central Perk
Tear Duct- I Love this
Lid- La La 


Hope you enjoyed this pictorial!


Maryam ox


Monday, January 11, 2016

Kat Von D Shade And Light Eye Contour Palette- Review And Swatches


       Kat Von D not only made a name for herself in her tattoo designs, but also in the beauty industry as well. The quality in her makeup has improved and she has one of the best formulas when it comes to her eyeshadows. The Kat Von D Shade And Light Eye Contour is no exception. It is the perfect neutral palette. If you love neutrals and are looking for an every day neutral palette as well as one that you can create night time looks then this lovely palette is the one to own. I also created a brown black smokey eye using this palette which you can checkout here.


The Kat Von D Shade And Light Eye Contour Palette retails at $ 46.00 and comes with 12 shades that are arranged in quads to help you create a look.


   The names are printed in the back of the palette but to me this is confusing. It would have been nice to have the names printed underneath each color. The eyeshadow is sleek enough to take it with you when traveling.


With this palette you can create day and night time looks. This a neutral lovers dream eyeshadow palette. I love the burnt brown color. It is amazing and a little goes a long way.

Swatches


Review

I do not know what formula Kat Von D uses in her eyeshadows palettes, but they are amazing! The Kat Von D Shade And Light Eye Contour Palette is fantastic. The pigmentation is wonderful and the colors are creamy and blend so well together. I wore these eyeshadows for 8 hours and they were still going strong with no signs of creasing. This is one my of favorite neutral palettes that I own and I am so happy I added this to my collection. If you love neutral colors you will not be disappointed with this gem. I highly recommend the Kat Von D Shade and Light Eye Contour Palette.


You can purchase this at:


Hope you found this review helpful and see you guys in my next blog post!


Maryam ox


*Product purchased by me*

Friday, January 8, 2016

Brown and Black Smokey Eye Ft. Kat Von D Shade and Light Eye Contour Palette


     Attempting to do a smokey eye can be a little intimidating. If you put too much black and bring it too high up and applying too much black eyeshadow below the lash line can make you look like a panda. One of the tricks to achieving a successful smokey eye is blending and gradually building up color instead of applying a heavy hand at the first try. I hardly ever do smokey eyes, but lately I have been practicing and loving how it looks. There are many variations of smokey eyes. You can do a heavy or a soft smokey eye and it is not limited in color either. Smokey eyes can range from black, purple, brown, bronze and so on. I hope you like how it came out and enjoy the pictorial. :)

*Pictorial*

1. For the first primer I used Urban Decay Primer potion for all over the eyes from lid to brow bone. When it was time to do my lid area I applied the nyx jumbo eye pencil in black and then applied the black eyeshadow for intensity of color so that it would not fade.

2. For the crease I used the red brown color and applied it in wind shield wiper motions. Blend.
3. I took the ivory color and applied it to my brow bone. Blend.
4. In the inner crease I used the mud brown color. Blend. If blending faded the color a bit add more until you get the intensity you want.
5. First, I applied nyx jumbo eye pencil in black on my lid and then took the black eyeshadow and patted it onto my lid. I applied about a layer or two of the eyeshadow. Once I did that I carefully blended the black upward toward the crease  making sure I didn't go too high up.
6. I took the same black eyeshadow and applied to my outer corner of my eye to increase the intensity of the look. Blend. I added some more of the black color and blended it again. It really is up to you how intense you want your smokey eye to be. 
7. Add a matte liquid or gel liner to the lid. I know it won't show much on my black eyeshadow, but I still wanted to add a wing to my makeup look for that extra glam. :)
8. Curl lashes and add black mascara.
9. Add black eyeliner to your water line.
10. First I took the dirt brown color and applied it below the lash line . Then I took the black eyeshadow and only added to the outer corner below the lash line. Blend to diffuse the color.
11. I used the cream color eyeshadow and applied it to my inner tear duct.
12. Add mascara to your bottom lashes.

Look complete!


*Finished Look*


 Using the brown instead of using the typical grey and black for a smokey eye was a nice contrast of colors. It also made my brown eyes pop. I really liked how it came out and I will be experimenting with more smokey looks ranging in different colors.


Hope you enjoyed this pictorial and see you guys in my next blog post.

Review of the Kat Von D Shade and Light Contour Eye Palette coming soon!


Maryam ox

Wednesday, January 6, 2016

Make Up For Ever Step 1 Nourshing Primer: Review


     Finding the right primer can be tricky if you do not know what you are looking for.  A tip for selecting the right primer is knowing what your skin needs. For example, if you buy a nourishing primer and you have oily skin it will make your makeup look extra dewy. If you buy a primer that gives your skin a matte finish and you have dry skin, then your foundation will look cakey. Not only do primers perfect our skin, but it also helps the makeup adhere to it making it last all day. I have tried many wrong primers because I was not paying attention to the needs of my skin. Once I understood that, I realized that since I have dry skin I needed a hydrating primer. At last I found a primer that I will probably for ever buy and that is the Make Up For Ever Step 1 Nourishing Primer. What I love about the Make Up For Ever Step 1 Primer line is they have a primer for all skin needs whether you have oily skin, redness, dry, large pores and more. 


The Make Up For Ever Step 1 Nourishing Primer retails at $36.00 (1.0 oz). This primer nourishes dry skin.


The nozzle is thin and squeezes out the product a little at a time which I love instead of accidentally squeezing too much product out.


The texture is creamy and has a nice light scent.


     Over All, I am absolutely in love with the Make Up For Ever Step 1 Nourishing Primer. I have used this primer with different foundations, even ones that were not meant for my skin and the primer still made my make up look amazing and at the same time giving my skin a nice dewy appearance. Some people may find that the price range is a bit expensive and so did I until I took advantage of the  sephora vib sale late last year and purchased it. It was worth every penny. If this primer were to run out I would still buy it at full price. It gave my dry skin the moisture it needed and made my makeup and skin look flawless, hydrated and fresh. It also made my foundation last all day which is also a plus. For those who are suffering from dry skin the Make Up For Ever Step 1 Nourishing Primer is a must have. 


You can purchase the Make Up For Ever Step 1 Nourishing Primer at :

Hope You enjoyed this review and found it helpful!

See you guys in my next blog post!


Maryam ox


*Product Purchased by me*

Monday, January 4, 2016

My Top Five Liquid Foundations and Swatches


Hey guys! For the past few years I have been experimenting with different foundations and trying to match them to my skin. The first few attempts at trying to match my foundation to my skin failed. I either looked like a ghost or I looked like I spent the day in a tropical island. After a few trial and errors, I finally got the hang of choosing the right foundation for my skin tone. I did however got my foundation matched to my skin tone at Sephora and at Mac makeup stands. That helped a lot and I would just match those foundations with the drugstore foundations and it made the process of picking the right foundation much easier. I only use foundations for dry skin and stay far away from matte foundations. Today I am going to show you some of my favorites. 


I know that Loreal True Match Foundation and Cover Girl Stay Fabulous foundation can be drying, but if you have a hydrating primer it will give your skin a dewy more hydrating appearance. If I wear those foundations alone it makes my fine lines and dry patches more noticeable. The reason I wear these it because it feels light weight on the skin and has amazing coverage.


      Since I have dry skin, I moisturize my face and apply a hydrating primer so that the foundation that I am applying looks smooth and dewy on my skin. These steps are a must for me. The purpose of primers is to fill in pores, fine lines and smooth out your skin depending on the kind of primer you use. There are different primers for different jobs.  For example, I use a hydrating primer because my skin is dry. Primers also make sure your foundation last all day and makes your face look flawless.


Loreal True Match Foundation Sun Beige W6- If you are looking for a light weight foundation, then this is a good choice. This can be drying on me at times which is why before I apply this I moisturize my face and apply a hydrating primer on top. Once that all sets I apply the foundation and it glides on my skin and does not make my dry patches show. It doesn't feel heavy on my skin which I love and lasts for most of the day. I am a W6 in the fall and winter months and a w7 during the spring and summer.


The Maybelline Fit me Foundation Dewy And Smooth(310) is a nice drugstore foundation for dry skin. When I applied this after moisturizing and priming my face, It really gave my skin a smooth appearance and has great coverage. It isn't as dewy as I hoped which makes this a good foundation for the summer months because during the summer months your glands produce more oils.


Mac Mineralize Moisture Foundation Nc 42- This a fantastic foundation for dry skin. I have never seen a foundation that give moisture to the skin like this one. It is light to medium coverage and gives the skin a natural look and dewy appearance. I applied moisturizer and hydrating primer and it made my skin a little too shiny. So I didn't apply a moisturizer and just applied a primer and this foundation. I wouldn't wear this in the summer months as it can make me look like a shiny ball. This is my go to for the fall and winter months. If you do wear this in the summer you can apply a translucent powder to your t zones to get the shine under control. I am an Nc 44 in the summer.


CoverGirl OutLast Stay Fabulous 3n1 Foundation 857- If you are looking for a drug store foundation that gives you full coverage and conceals all at once then this one is great. This foundation also can look dry at times on me so as usual I moisturize and apply a hydrating primer. This foundation conceals everything! I love it. It really gives my skin a smooth appearance and covers the redness on my cheeks and around my nose really well. This foundation lasts all day and gives your skin a flawless appearance. 


     Urban Decay The Naked Skin Foundation 7.0- This foundation lives up to its title. This foundation look so natural and light weight on my skin and gives it a dewy appearance.  I love wearing this foundation in the summer months since it is so lightweight. This foundation is light to medium coverage and is comparable to Mac's Mineralize Moisture foundation just a bit less dewy. 

Swatches! 


     These foundations must seem that they do not match my skin. Since I am Muslim, I cover everything except for my face and hands. My face gets the most sun exposure so my face much darker than the rest of my body so these foundations match the skin tone on my face. When I apply the foundation I just bring it down to my neck. I tried to match foundation according to my skin tone on my neck to my face and I looked like a ghost lol. I did get my foundation matched at Sephora and at Mac and these were the recommendations for the Mac and Urban Decay foundations. As for matching the drugstore foundations, I would just bring my mac foundation and hold it next to the foundations in the store to see which is a close match.


Conclusion

     There you have guys my top 5 liquid foundations. Again moisturizing especially if you have dry skin is key as well as applying a good primer before foundation application, but the most important beauty tip is taking care of your skin is what really makes your foundation look great. Your skin is your canvas and your foundation will only look great if your skin is maintained. I am still looking forward to trying out more foundations . There is so many out right now that I am dying to try and more and more foundations are gearing toward us dry skins folks which I am excited about.


I hope you enjoyed this blog post and found it helpful!

What are your favorite foundations? If you have dry skin like me what is your go to foundations?
Leave a comment below!


Maryam ox


*Products purchase by me*